Last updated: August 2016

Get Started
This document includes steps to recover your 819W router and/or AP. If your issues are AP-only, you can skip the router recovery steps.
Download Software
- Create a temporary folder on your desktop to store the downloaded files used in the following steps.
- Open a browser on your computer and go to www.cisco.com. Login with your CCO credentials
- Download the recommended IOS for the Cisco 819 Hardened 3G with Dual Radio 802.11n WiFi Integrated Services Router. Save the file to your temporary desktop folder.
- Download the recommended IOS for the embedded AP. Save the file to your temporary desktop folder.
- Download the Unified Mode IOS for Unified Access and Enterprise Branch demonstrations.
- Download the Autonomous Mode IOS for Collaboration demonstrations.
ap802-k9w8-tar.152-2.JA.tar
- Download and install Tera Term.
- Download and install TFTP server utility.
Connect Devices
- Connect PC to the console port of the router.
- Connect the flat, blue rolled cable (included in the box) to the port on the router labeled CONSOLE.
- Connect the other end of the rolled cable to one of the COM ports of your computer.
- Connect PC to a LAN port on the router.
- Connect a straight through Ethernet cable to port FE 0 on the router.
- Connect the other end to the wired Ethernet port on the PC.
- Configure PC (Local Area Connection) as follows
- IP address: 10.0.0.2
- Subnet mask: 255.255.255.0
Disable the wireless LAN adapter of the PC.
Software Setup
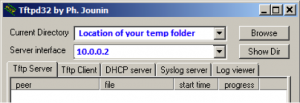
- Launch and configure TFTP server:
- Current Directory: Browse to temporary desktop folder.
- Server Interfaces: Select 10.0.0.2 from the dropdown.

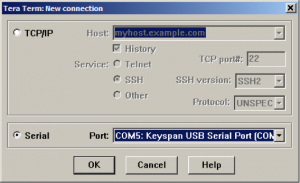
- Launch and Configure Tera Term:
- From the New Connection window, select Serial and then select the Port on your PC that is connected to the router.

- From the New Connection window, select Serial and then select the Port on your PC that is connected to the router.
- Click OK.
- Press the Enter key and verify that the router responds.
Recover Router in ROMmon
- Power on your router. From the Tera Term window, you will see that the router is booted into ROMmon mode as indicated by the router prompt: rommon 1 >.
- Enter the following commands to transfer the necessary router IOS via TFTP:
rommon 1 > IP_ADDRESS=10.0.0.3 IP_SUBNET_MASK=255.255.255.0
rommon 3 > DEFAULT_GATEWAY=10.0.0.1
rommon 4 > TFTP_SERVER=10.0.0.2 TFTP_FILE=c800-universalk9-mz.SPA.153-2.T.bin tftpdnld - When prompted if you wish to continue, enter y.
Invoke this command for disaster recovery only.
WARNING: all existing data in all partitions on flash will be lost!
Do you wish to continue? y/n: [n]: y
- Wait for process complete. Router should boot up using the IOS.
rommon 8> boot
Transfer Files to the Router
- Create router interface connection for file transfer from PC to router flash.
Router> enable Router# conf t Router(config)# int vlan 1 Router(config)# ip add 10.0.0.1 255.255.255.0 Router(config)# no shut Router(config)# end
- Transfer router configuration to router flash.
Router# copy tftp: flash: Address or name of remote host []? 10.0.0.2 Source filename []? name of your router config .txt file
- Transfer the AP IOS to router flash.
Router# copy tftp: flash: Address or name of remote host [10.0.0.2]? <Enter>
Source filename []? ap802-k9w8-tar.152-2.JA.tar
Destination filename [ap802-k9w8-tar.152-2.JA.tar]? <Enter>
The name of the AP IOS file will be the file you downloaded in an earlier step. (ap802-k9w8-tar.152-2.JA.tar). - Copy the config files to startup-config.
Router# copy flash:name-of-router-config.txt startup-config
- Replace the name-of-router-config.txt value with the actual name of your router config file. If you are unsure, type copy flash:? to see the list of files currently stored in flash.
Recover AP from ROMmon Mode
- From router, initiate the follow command to format AP flash
Router# archive tar /xtract tftp://TFTPhostIP/ap802-k9w8-tar.152-2.JA.tar flash:1:
- Console to AP.
Router# service-module wlan-ap 0 reset
- Wait for the AP to reboot.
- Session to the AP to confirm unified mode.
Router# service-module wlan-ap 0 session
Trying 10.66.101.113, 2002 ... Open
Connecting to AP console, enter Ctrl-^ followed by x,
then "disconnect" to return to router prompt <Enter>
Username: cisco
Password: Cisco
AP8478.acaf.cb52> enable
Password: Cisco
AP8478.acaf.cb52#show capwap client config
configMagicMark 0xF1E2D3C4
chkSumV2 10292
chkSumV1 59929
swVer 7.3
adminState ADMIN_DISABLED(2)
name AP8478.acaf.cb52
Configure Router for Cisco dCloud
Your router can now be configured for Cisco dCloud using any of the options available. [Show Me How]
- Endpoint Wizard
- Copy via HTTP
- Copy via Console
If you have already registered your router, you DO NOT need to register it again. Download the configs or Router Setup Wizard for registered routers from Dashboard > Routers.
Upgrade AP to latest WLC Code
- Schedule any Enterprise Networking or Security Cisco dCloud demo with a vWLC. (ISE Mobility Deep Dive, ISE Secure Access Wizard, Cisco Virtual Wireless LAN Controller 8.5 Wizard and Features, etc )
- Power off the router, then power back on when the demo session is Active.
- Wait for wireless to connect to new WLC and upgrade to the latest AP code. This could take a while (up to 30 minutes).
- Once the AP upgrade is complete, reboot the AP.
- Issue the show capwap client config command from the AP and verify the swVer is the latest as expected.